


HOW TO MAKE A SHELL BRACELET?
HOW TO MAKE A SHELL BRACELET?
Shell bracelets have been worn by both men and women for centuries. Whether for purely aesthetic purposes, to ward off evil spirits, or to bring luck, they are marine jewelry of choice! Some are adorned with cowries, small mollusks whose white shell has a unique bulging shape. Complemented by beads, stones, or other shells, they are timeless accessories.
They are often worn on the wrist or ankle, reminding one of summer and vacations by the sea… But how do you make a shell bracelet? What materials should you choose? Dive into making a marine jewel with your children and discover wonderful ideas to occupy your holidays and easily complete your jewelry box.
THE MATERIAL FOR A TRENDY SHELL BRACELET
Before venturing into making a shell bracelet, it's important to list the necessary materials. What follows will be much simpler, and you'll be much more organized!
1 - CHOOSING THE RIGHT SHELLS
This first step is very important, if not crucial. The choice of shells for your homemade bracelet will depend on several factors: the materials you have at hand, your budget, and where you live. If possible, head to the beach to collect as many shells as you can! Otherwise, you can buy them online or visit our top 10 ranking of the most beautiful sea shells.
Here are the mollusks we recommend for making a bracelet:
-
The cowrie: slightly bulging and white, its design is very trendy, as simple as it is original! It has a small opening, which makes it easy to attach.
-
The whelk: with its pointed spiral shell, it can easily be used to make a bracelet.
-
The starfish: for a bracelet, this shell (which isn't really one) is a very good choice! Prefer smaller models of a few centimeters or millimeters.
-
Other shells: prefer uniform and quite small specimens (1-3 cm), which you can easily collect on the beach in summer.
2 - CLASP AND SUPPORT FOR A SHELL BRACELET

When making a shell bracelet, think about the support. Do you want a simple, soft-on-the-wrist, and natural jewel? Then opt for a cord! Prefer a more luxurious metal set? Then choose a chain or chainette! There are multiple types of supports:
-
A cotton or leather cord: soft, comfortable, and durable, the cord is perfect for giving a vintage and "homemade" feel to your jewelry! Whether it's leather, textile, or cotton, it's an excellent choice. Prefer black or beige. You can also make it yourself like a Brazilian bracelet. If you don't have this material, shoelaces or kitchen twine could do the trick.
-
A chainette: whether in gold, silver, or stainless steel, the chain is perfect for a discreet jewel. Its fine and strong links can be zinc, stainless steel, gold, or silver. You can find them in jewelry stores, online, or you can even reuse one of your old jewelry pieces!
-
Nylon: very strong but not very aesthetic, however, you can thread variegated beads for a colorful result!
The choice of clasp is directly related to the support. If you've opted for a cotton or textile bracelet, then a sliding marine knot might be more suitable, although a metal clasp could also do the trick.
If you've decided to use a metal chain, then the lobster clasp is the best solution. There are other types of fastenings, but they are more expensive and less practical to implement than this one.
3 - TOOLS FOR A SUCCESSFUL DIY SESSION
Finally, choosing the right tools is crucial. For safety and efficiency, here's the equipment to plan for a successful marine bracelet:
-
Scissors: to cut and trim your material, and pierce your shells.
-
A punch: the perfect accessory if you want to easily pierce your shell! But you can also use a compass.
-
Pencils: for precise work and drawing your models.
-
Paint and decoration: for a colorful and original bracelet!
-
Safety equipment: glasses, old clothes, and gloves.
-
A pair of pliers: prefer a small model that's easy to handle.
-
Glue: to stick and fix your shells (not mandatory).
With all this, you're ready for a DIY session like no other!
MAKING A SHELL BRACELET EASILY
Now that your materials are ready, we can focus on making the shell bracelet. Prepare your workspace by smartly organizing your tools and materials around you. Your work will be all the more efficient!
1 - MAKING A HOLE IN YOUR SHELLS
To make a shell bracelet, you'll need to pierce your shell. To do this, make a small notch where you want to pierce it, then use a punch, compass or scissors to finish the job. For more details on this step, read this article: how to make a small hole in a shell.
2 - PREPARING AND WASHING THE MATERIALS
Next, you will need to wash your shells. For this, you can scrub your shells with a toothbrush and toothpaste or very diluted bleach water (1/20th). Then rinse them with cold water and let them dry. If you want to know more, check here: how to clean a mollusk.
3 - PAINTING AND EMBELLISHING YOUR SHELLS
Then, it's time to get serious by painting and decorating your shells! By painting your shells, you ensure a pretty shell bracelet that will catch the eye. Of course, if you've chosen cowries or a white or solid shell, you're not obligated to follow this step. But don't forget to polish them well so they shine!
Arm yourself with paint and any other decorative accessory (beads, ribbons, glitter, etc.), and listen to your inner artist! We recommend using acrylic paint, which is of good quality and easy to use. For more details, you can visit this page: how to paint a shell.
4 – POSITIONING AND TYING THE SHELLS ON THE BRACELET
The penultimate step involves attaching and threading the shells onto your bracelet. If it's a cowrie bracelet, you'll have no trouble performing this operation. Otherwise, thread them one by one gently through the small hole you previously made. Be careful to leave enough space for the clasp.
5 – CLOSING AND ATTACHING THE BRACELET
Finally, you will need to attach your bracelet. If you want to use a clasp, make a double knot, or a fisherman's knot at each end of it, and you're done! If you want to make a sliding marine knot, this tutorial could help: how to tie a knot for a bracelet.
SOME COOL JEWELRY IDEAS FOR YOUR WRIST OR ANKLE
If you're lacking inspiration or simply looking to imitate existing shell jewelry, don't hesitate to use these different bracelets from our shop as models!
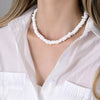
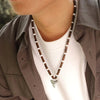
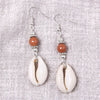
1 - A COWRIE BRACELET
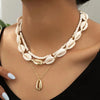
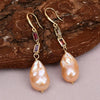
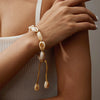
If you're short on ideas, then you can model after this lovely cowrie bracelet. This mollusk, whose shell is bulging, white, and very trendy, makes for a simple, easy-to-make and wear piece of jewelry. If you feel like it, you can even add some beads for more color or paint your cowries!
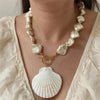
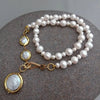
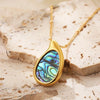
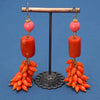
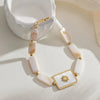
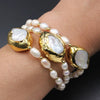
2 - A BRACELET WITH SHELL PENDANTS
For more originality, don't hesitate to embark on making a bracelet with shell pendants. To create this richly adorned piece of jewelry, you'll need to use many different shells such as starfish, whelks, conches, and scallops. Try to harmonize the shades by choosing beige or white mollusks and a golden chain.
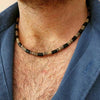
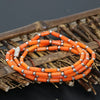
3 - A BRAZILIAN BRACELET
Finally, adopt a fresh and colorful style by making a Brazilian shell bracelet! A true star of the summer, beach, and holidays, this type of jewelry is always in fashion. For this, you'll need to braid your cord yourself with strands of different colors for a stunning result. Add a small cowrie and you're all set!
WEAR YOUR OWN SHELL BRACELETS!
With this step-by-step guide, you'll have everything you need to make a seashell bracelet. With a few tools, some seashells and a few ideas, you'll be amazed at the results! Whether you decide to make a cowrie shell bracelet for the wrist, or an anklet chain, the choice is yours! And don't forget to send us photos of your creations - we'll be delighted to publish them!
And if you'd like to give your imagination a boost, you can visit our specialized online boutique. We create and sell natural and marine shell jewelry of all kinds, for all tastes and occasions. Maybe some of them will seduce or inspire you!


Leave a comment