


How to drill a hole in a shell for jewelry?
Are you looking to add a touch of nature to your jewelry collection? Drilling holes in shells opens up a world of creative possibilities. Shells are not just beautiful; they carry the essence of the ocean and can become stunning focal points in your handmade pieces. Whether you're crafting earrings, necklaces, or bracelets, incorporating shells can elevate your designs from ordinary to extraordinary.
Imagine wearing a piece of the beach that tells its own story—a reminder of sunny days spent by the shore. If you're ready to transform these natural treasures into wearable art, grab your tools! This guide will walk you through everything you need to know about drilling holes in shells for jewelry-making fun. Let's dive right in!

Why use shells for jewelry?
Shells are nature's gems, bursting with character and charm. Each shell tells a different story, showcasing unique colors, patterns, and textures that can't be replicated.
Using shells in jewelry creates an organic feel that plastic or metal simply can't match. They bring a sense of tranquility and connection to the ocean, making your creations not just accessories but pieces of art.
Moreover, shells offer versatility. You can find them in various shapes and sizes—perfect for earrings, pendants, or even statement bracelets. Their lightweight nature means comfort without sacrificing style.
In addition to their aesthetic appeal, using natural materials like shells is eco-friendly. By repurposing these beauties instead of buying synthetic alternatives, you contribute to sustainable fashion practices while expressing your creativity.
Tools and materials needed
To drill a hole in a shell for your jewelry project, you’ll need some specific tools and materials. First, gather your shells. Look for smooth ones that are not too thick.
- Next on the list is a rotary tool or Dremel. This will make drilling easier and more precise. Choose a diamond-tipped bit suited for the material of the shell.
- You’ll also want safety goggles to protect your eyes from shell fragments while drilling. A sturdy work surface or clamp can help hold the shell steady during the process.
- Don’t forget about water! Keeping the area moist will prevent overheating and cracking during drilling.
- Have some sandpaper handy to smooth out any rough edges after creating holes in your shells. With these essentials gathered, you're ready to get started on crafting stunning pieces of jewelry.
Steps to drilling a hole in a shell
Start by securing the shell on a stable surface. You can use a soft cloth or towel to prevent any slipping.
Next, choose the right drill bit—a small diamond-tip or carbide bit works best for shells. Ensure it is suitable for delicate materials. Now, mark where you want the hole with a fine-tipped marker or pencil. This helps guide your drilling and ensures precision. Begin drilling at a slow speed to avoid cracking the shell. Apply light pressure as you go; let the drill do its job without forcing it. Keep checking your progress often, and clean away any debris that builds up around the hole. Once you've drilled through, smooth out any rough edges with sandpaper if needed. Rinse off dust particles before moving forward in your jewelry-making process. Your shell is now ready for beautiful embellishments!
Tips for success
- Start with a steady hand. The more control you have, the smoother your drilling will go.
- Use a clamp or vice to secure the shell. This prevents slipping and provides stability while working.
Drill at a slow speed. Rushing can crack or chip the shell, ruining your project.
- Keep water nearby to cool down both the drill bit and the shell. This helps to reduce friction and minimizes breakage.
- Experiment with different bits for various types of shells. A diamond-tipped bit works wonders on hard surfaces, while standard bits are perfect for softer shells.
- Be patient throughout the process. Taking your time leads to better results and allows for creativity in placement and design later on.
- Embrace mistakes as learning opportunities; they’ll help refine your technique over time.
Creative ideas for using drilled shells in jewelry
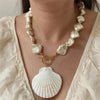
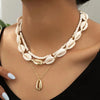
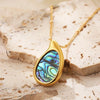
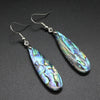
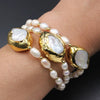
 Drilled shells can transform your jewelry-making game. Consider turning them into stunning pendants for necklaces. Their natural sheen adds a unique touch.
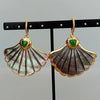
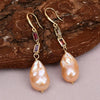
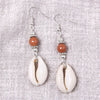
You can also create earrings by pairing smaller shells with colorful beads. This combination brings out the beauty of both materials while keeping the design light and playful.
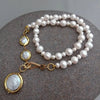
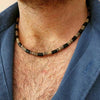
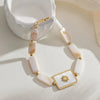
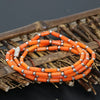
Another idea is to string multiple drilled shells together to form a striking bracelet. Layering different shell types or colors enhances visual interest, making each piece one-of-a-kind.
For something more adventurous, incorporate drilled shells into hair accessories like headbands or clips. They add an earthy vibe that works beautifully in bohemian styles.
Think about using drilled shells as charms on keychains or bag tags. These small additions will surely catch attention and spark conversations wherever you go.
Safety precautions to drill a hole in a shell
 Working with shells can be enjoyable, but safety should always come first. Wearing protective eyewear is essential. Tiny shell fragments can become airborne and cause injury to your eyes. It's also wise to wear a dust mask or respirator if you’re working with power tools. Shells can produce fine particles that aren’t safe to inhale. Ensure your workspace is organized and well-lit. A cluttered area increases the risk of accidents. Keep all tools within reach, but out of the way when not in use.
Always secure the shell firmly while drilling. This prevents it from slipping and reduces the chance of injury or damage to both you and the shell itself. Take breaks as needed to avoid fatigue. Staying focused will help maintain precision while keeping safety at the forefront of your craft session.
By following the steps outlined above, you can create stunning pieces that showcase the elegance of nature. Whether you’re crafting necklaces, earrings, or bracelets, drilled shells can elevate any design.
As you explore this craft further, let your imagination run wild. Each shell tells its own story—embrace it! Happy crafting!


Leave a comment